Unlike the Windows operating system, Mac OS is much more stable and robust. It doesn’t get infected or crash so quickly however you can’t stop issues that are related to hardware failure. Most performance issues are due to an old HDD or low memory. You can upgrade RAM or replace the HDD with SSD to give a new life to your device.
Most of the users are not aware of how to clone Mac Hard Drive to SSD. Cloning disk on macOS is an easy process however if you are not cautious, you may end up losing your important data. If you ever feel that you won’t be able to follow the step-by-step process to clone disk on Mac, it is recommended to use one of the best Mac cloning software in 2021. SSD makes the computer run faster and gives you an uninterrupted gaming experience.

What Do You Need?
- To clone the disk on Mac, you will need an external SSD. The storage capacity should be equivalent to or higher than the old HDD.
- A connector to connect the SSD to your Mac will be required as it doesn’t come along with the SSD. A few external drives may come with the USB connector however the internal hard drives come with 2.5in SATA drives or 3.5in SATA drives.
- You may need some software to clone Hard Drive to SSD on Mac if the manual steps can’t finish the task properly. Check out the Best Mac Cloning Software in 2023.
How to Clone My Mac Hard Drive to SSD
Step 1. Take out the SSD from the box and mount it properly with the SATA connector.
Step 2. Ensure to connect it properly with the adaptor and connect it with the USB port.
Step 3. Turn ON your Mac and once it boots up, turn ON the external Drive.

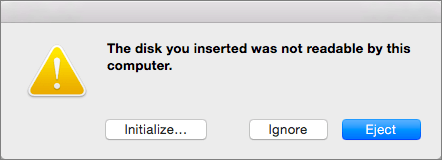
Step 4. You will see an error message stating ‘The disk you inserted was not readable by this computer as there is no data or file format of the disk. We need to format it in macOS readable format to make it compatible.
Step 5. Click on the ‘Initialize’ button on the message.

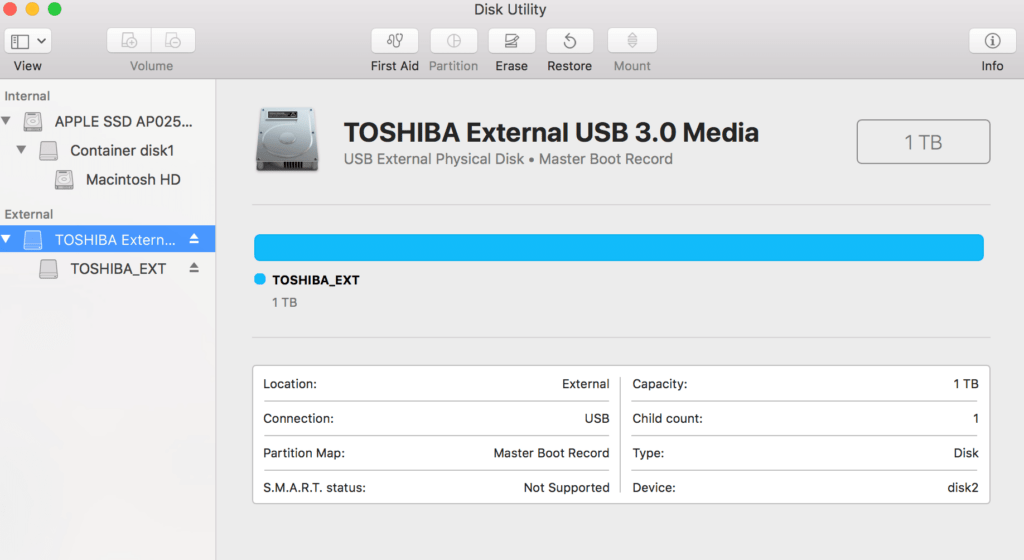
Step 6. It will open the Disk utility window with 2 hard drives in the left-hand side panel. Internal and External.
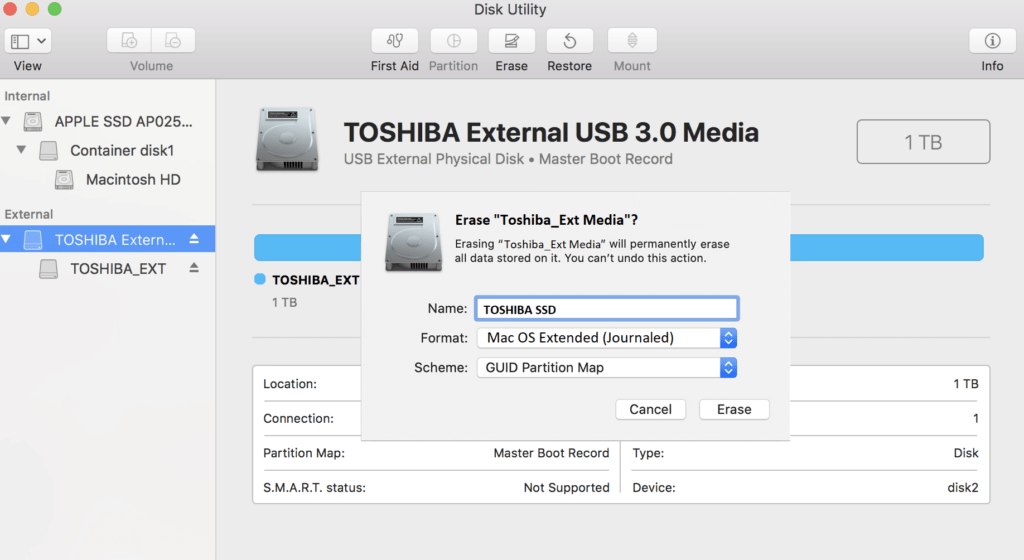
Step 7. Rename the external Hard Drive to avoid any confusion. The new hard drive should be converted into macOS Extended (Journaled).

Step 8. On the top menu, click on the ‘Erase’ option to rename the drive and select macOS Extended (Journaled) as the drive format. Click on Erase to initiate formatting.

Step 9. Once the format process is done, it will pop up a window asking if you wish to back up with Time Machine. Click on the ‘Don’t Use’ button on this message.
Step 10. Click on Show details to ensure the process is completed successfully without any error message. Ensure that both Internal and External hard drives are now in macOS Extended (Journaled) format.
Step 11. Restart the computer once before initiating the cloning process. After you format a hard drive, it becomes essential to restart before you clone Mac Hard Drive to SSD.

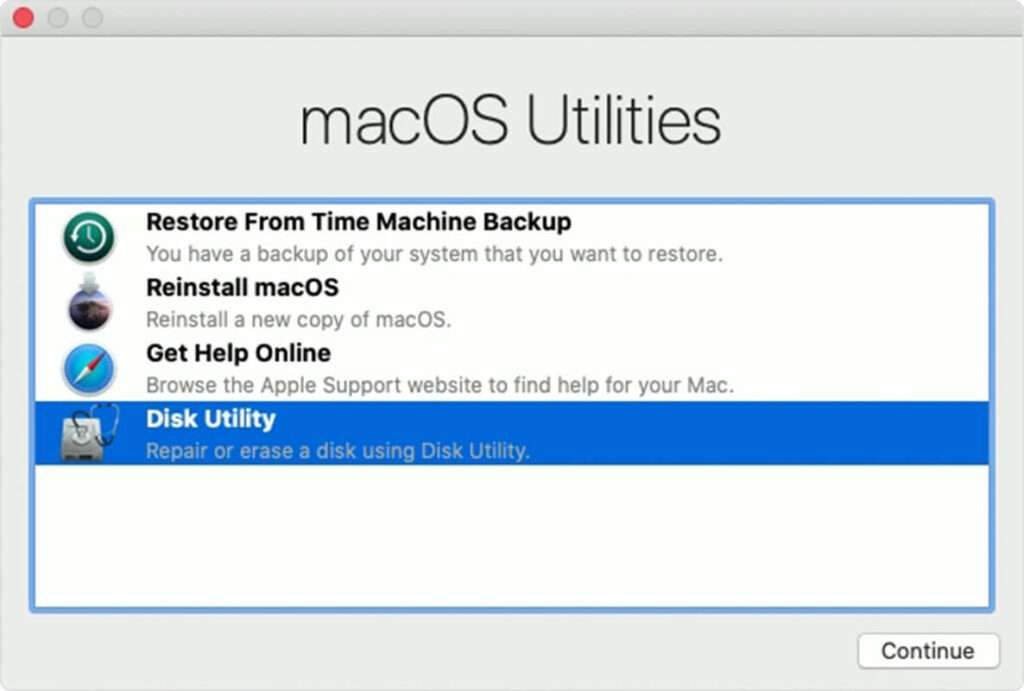
Step 12. While the computer is restarting, press and hold the (Command + R) key combinations to open the Utility Menu. Click on Disk Utility from the Utility menu.
Step 13. It will show the internal and external hard drives along with the disk image of your internal hard drive.
Step 14. Your external drive is ready to be cloned with the internal drive. We can do it with the Restore option.
Step 15. Select the External Drive (SSD) and click on the Restore button on the disk utility window.
Step 16. Select the source drive i.e., the old HDD in Restore from the drop-down list.
Step 17. Click on the Restore button to initiate the process.
Step 18. The process may take longer depending on the data on your old hard drive.
Step 19. Click on the Apple menu and click on Startup Disk.
Step 20. Choose the New Hard Drive to use to boot the system and click on the Restart button.
Both the hard drives are up and running now. Once you clone Hard Drive to SSD on Mac, you can replace the HDD with SSD or use it as a backup drive.
Clone Disk on Mac with Mac Cloning Software
Using one of the Best Mac Cloning Software in 2023 can ease up the process as it gets automated. Such tools offer different options for Cloning, Imaging, Restore, or Backup the device. You can use the user-friendly console to clone disk, volume, or a network drive. All you need to do is select the source drive and the destination drive and you are good to go. It will automatically take a backup of the data, format the drive as and when needed, and clone the disk on macOS. You can also try the FREE software or a trial version with a 30-days cancellation policy. When it comes to Data, we can’t take any risk on it.
Summing Up: Clone My Mac Hard Drive to SSD?
Upgrading hardware on your own may be risky if we are not aware of how to clone Mac Hard Drive to SSD. A single mistake and all your data can be lost. Transferring from HDD to SSD will give a new life to your Mac and boost system performance. Before you clone Hard Drive to SSD on Mac, ensure you have backed up your data and follow the step-by-step process as mentioned above. If you have important stuff to clone, make use of one of the best Mac cloning software to clone disks on macOS. Upgrading from HDD to SSD, adding up RAM, or upgrading the CPU can make your computer function as well as new.
